Task 1: Introduction: Incident handling
This room covers an incident-handling scenario using Splunk. Splunk is a leading SIEM solution in the market that can collect, analyze, and correlate network and machine logs in real time. On the other hand, a security incident is any event or action that negatively impacts the security of a user, computer, or organization. Examples include system crashes, unauthorized access to sensitive information, defacement of websites, or using restricted devices like USBs against company policy.
By the end of this walkthrough, you should be able to:
· Use OSINT to investigate attacks
· Map attacker activity to the cyber kill chain
· Conduct effective searches in Splunk to investigate logs.
· Understand the value of host-centric and network-centric log sources.
Task 2: Incident Handling — Life Cycle
In our role as an Incident Handler / SOC Analyst, we aim to understand the tactics, techniques, and procedures used by attackers. After that, we can improve our ability to stop/defend/prevent the attack.
The Incident Handling procedure consists of four distinct stages. Let’s quickly review each stage.
1. Preparation phase
Involves ensuring organization readiness against an attack by recording the needs, outlining the rules, integrating security measures such as EDR / SIEM / IDS / IPS, etc., and also involves educating employees
2. Detection and Analysis
Identify an incident and analyze it. Involves receiving notifications from security measures such as SIEM/EDR and examining them to identify the underlying issue and searching for unidentified risks.
3. Containment, Eradication, and Recovery
Necessary steps to stop the incident from spreading and protect the network, quarantine the affected host, remove all remnants of infection from the network, and regain control from the attacker. This included disabling compromised accounts, such as NT AUTHORITY/IUSR, and isolating the affected systems from the network to stop any lateral movement. In the eradication phase, the team focused on removing all malicious files, scripts, or any remnants of the attacker’s presence. Furthermore, they closed any exploited vulnerabilities, particularly those linked to CVE-2014–6271, ensuring no remaining entry points were left unaddressed before proceeding to recovery.
4. Post-Incident Activity/Lessons Learnt
Reflection on activity after the incident and knowledge gained from experience Include pinpointing vulnerabilities that caused the attack, implementing detection guidelines to prevent a repeat breach, and training the staff as needed. The lesson learnt is the importance of conducting regular vulnerability assessments and patch management practices to prevent similar attacks from succeeding in the future.
Task 3: Incident Handling: Scenario
In this scenario, Wayne Enterprises’ suffered an attack after the attackers broke into their network, found their way to their web server, and successfully defaced their website http://www.imreallynotbatman.com. Now the website displays the attacker’s trademark with the message YOUR SITE HAS BEEN DEFACED. Lucky for them, they have Splunk solution setup. Using this solution, our goal is to investigate this cyber attack and map the attacker’s activities into all 7 of the Cyber Kill Chain Phases.
Since Wayne Enterprises has requested us ( You and I) to join their SOC Analyst, Let’s go hunting for these bad actors. This is going to be a walk in the park. Do you know why? They had Splunk in place so we have all the logs we will require to gather as much as we can about these bad actors. Let’s go.
Our resources include logs from various sources like wineventlog, winRegistry, and fortigate_utm, all stored in index=botsv1.

Task: 4 Reconnaissance Phase
Reconnaissance is when someone tries to gather information about a target, such as details about systems, web apps, employees, or locations.
In this case, we’re analyzing an attempt to gather information on the web server ‘imreallynotbatman.com’. The first step is to look at logs that record inbound traffic to the web server. Using the search query index=botsv1 imreallynotbatman.com, we look for logs in the index ‘botsv1’ that contain this domain.
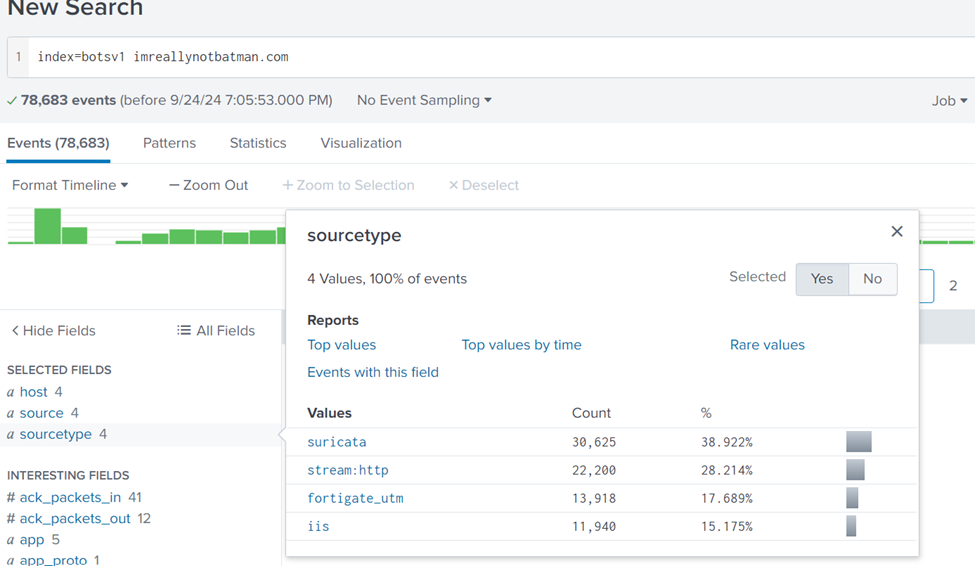
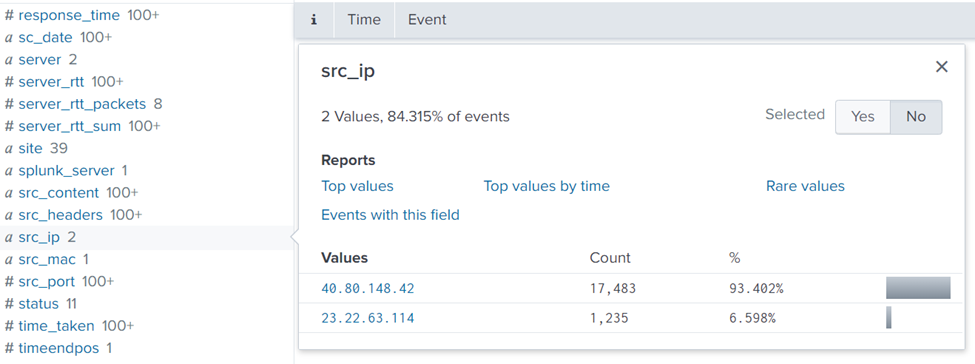
The logs show 4 different source types: suricata, stream, fortigate_utm, and iis. To find out which IPs are probing the webserver, we start by examining the stream:http logs, focusing on the src_ip (source IP address). After searching, we find two IP addresses: 40.80.148.42 and 23.22.63.114. The first IP has the most logs, suggesting it may be the main one responsible for recon. This is the new search query: index=botsv1 imreallynotbatman.com sourcetype=”stream:http”
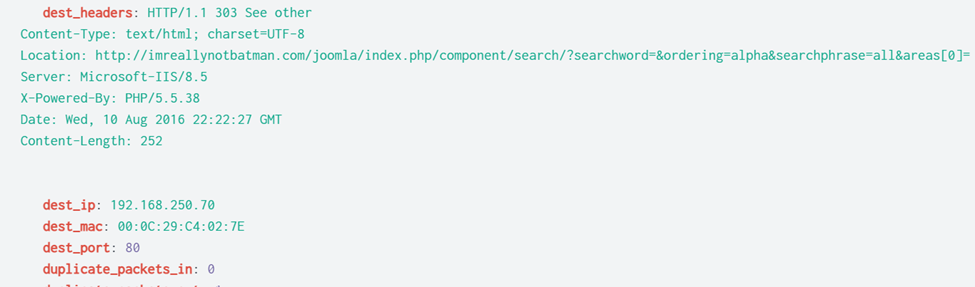
To confirm this, we examine logs related to IP 40.80.148.42, looking at interesting fields such as User-Agent and URIs to see what kind of traffic it’s generating. We find that this IP has been probing the webserver. Dest_ip 192.168.250.70 is that of the server.
To validate if the IP is scanning the server, we’ll check the Suricata logs using the search query index=botsv1 imreallynotbatman.com src=40.80.148.42 sourcetype=suricata. This will show if any security rules were triggered, confirming the scanning activity. The image below suggests attempts of site cross-scripting on the webserver.
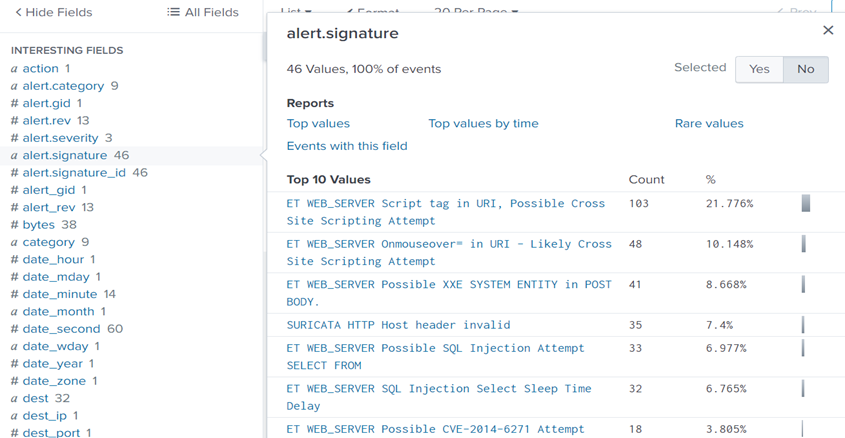
Question 1: One Suricata alert highlighted the CVE value associated with the attack attempt. What is the CVE value?

Answer: CVE-2014–6271
Vulnerability Research (CVE-2014–6271)
CVE-2014–6271, also known as Shellshock with a score of 9.8 and a CVSS v3.1 Vector AV:N/AC:L/PR:N/UI:N/S:U/C:H/I:H/A:H, which is a critical vulnerability in Bash that allows attackers to execute arbitrary code over the internet. This vulnerability is easily exploited as anyone can do it with minimal effort and privileged and user interaction is required. This could have enabled the attacker to compromise the system by exploiting unpatched software. The exploitation of this vulnerability can lead to loss of confidentiality, integrity, and availability of the infected system.
Attacker Motivation and Profile
Considering the tactics used, it’s likely the attacker was motivated by financial gain or the intent to exfiltrate sensitive data. The exploitation of CVE-2014–6271 suggests they were targeting unpatched systems to gain unauthorized access. Profiling the attacker in this way helps inform future strategies for improving threat detection and incident response.
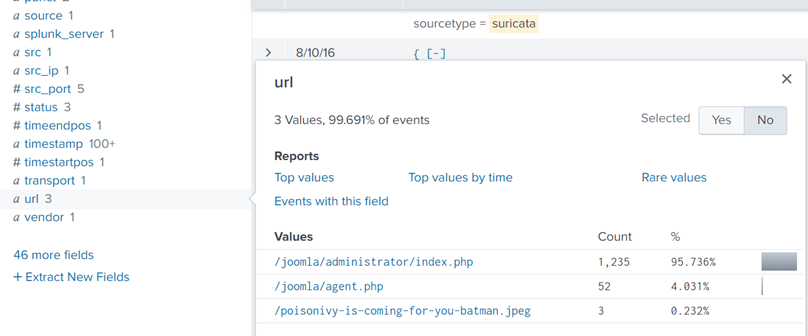
Question 2: What is the CMS our web server is using?
When we look at the interesting field of http.url, we find the CMS (Content Management System) that the web server is using.

Answer: Joomla
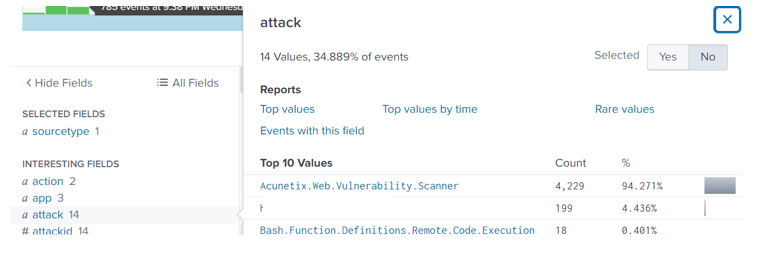
Question 3: What is the web scanner, the attacker used to perform the scanning attempts?
Search query used: index=botsv1 imreallynotbatman.com src=40.80.148.42 sourcetype=suricata
If we inspect the http.http_user_agent or http_user_agent interesting fields, we find a log for a well-known web scanner software. This has to be the tool the attackers used for scanning attempts.
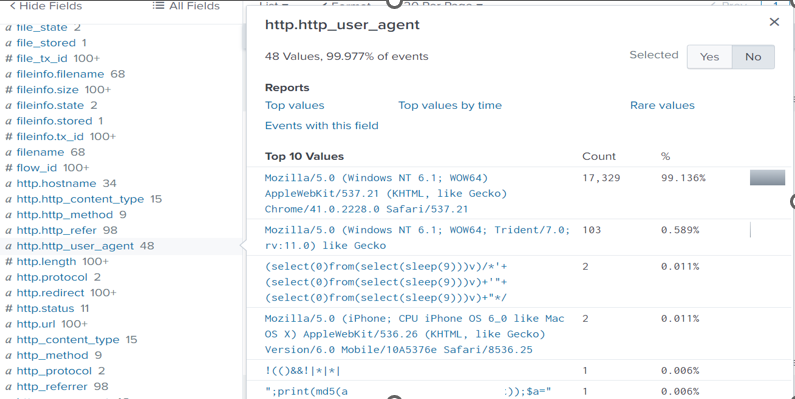
Answer: Acunetix
Question 4: What is the IP address of the server imreallynotbatman.com?
Using the same search query above, let’s inspect the dest_ip interesting field. We find 2 IP addresses, but something stands out. The first IP has the largest count suggesting that it’s probably the website’s address.

Task 5: Exploitation Phase
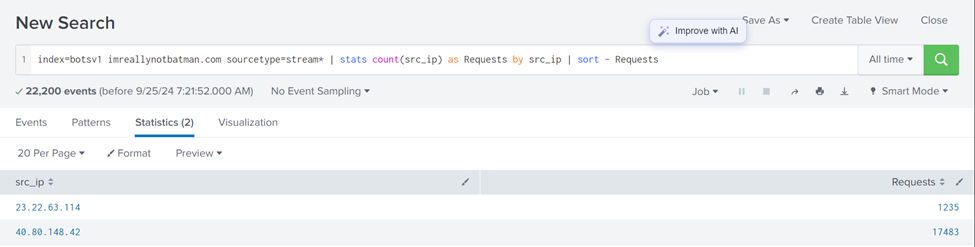
The attacker needs to exploit the vulnerability — the one we discovered — to gain access to the server. To investigate whether the attacker managed to exploit our server, we begin by analyzing the traffic to the web server. From earlier phases, we found that two IPs were scanning our web server, one of them being 40.80.148.42. This IP used a tool called Acunetix to scan our server at IP address 192.168.250.70. To see how many requests these IPs sent, we run a search query that counts requests by source IP. This shows us how active each IP was.
Search Query: index=botsv1 imreallynotbatman.com sourcetype=stream* | stats count(src_ip) as Requests by src_ip | sort — Requests. This query uses the stats function to display the count of the IP addresses in the field src_ip.
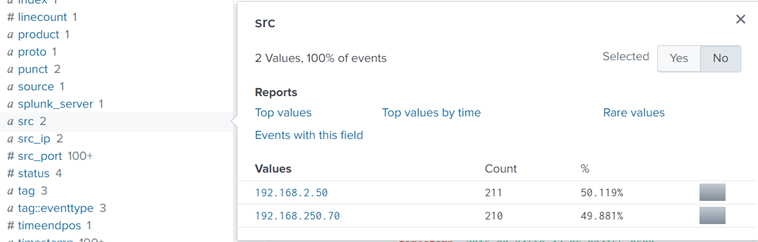
After that, we will limit our investigation to the IP address of the server, 192.168.250.70, and concentrate on HTTP traffic. We identify three IP addresses that are sending requests to our server. The majority of these requests involve using the POST method, which is commonly utilized for submitting data, such as login details.
Search Query : index=botsv1 sourcetype=stream:http dest_ip=”192.168.250.70″. Inspect the http.method and src_ip interesting field to find out more.
We also noticed that our server is running Joomla, a content management system (CMS), and its admin login page is located at /joomla/administrator/index.php. This is crucial because attackers often target such pages to brute-force their way into accounts.
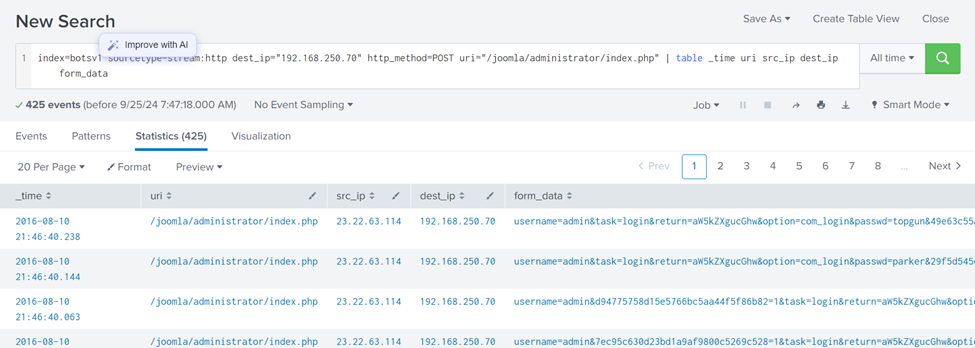
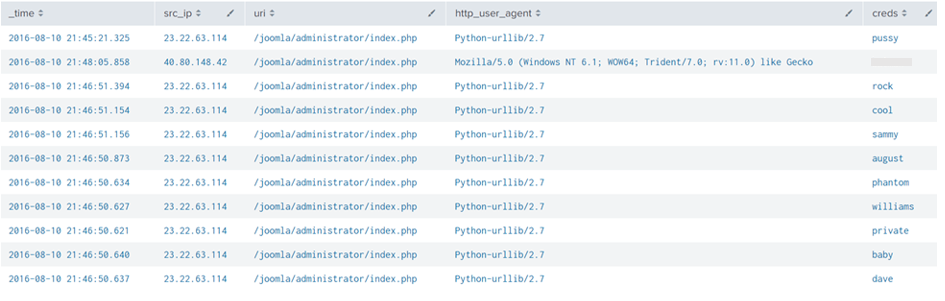
By focusing on the traffic to the login page, we find that the attacker is sending POST requests, trying multiple passwords to log in as the administrator. The source IP for this attack is 23.22.63.114, and it’s clear that they’re using automated software to guess the password, given how fast they attempt different passwords
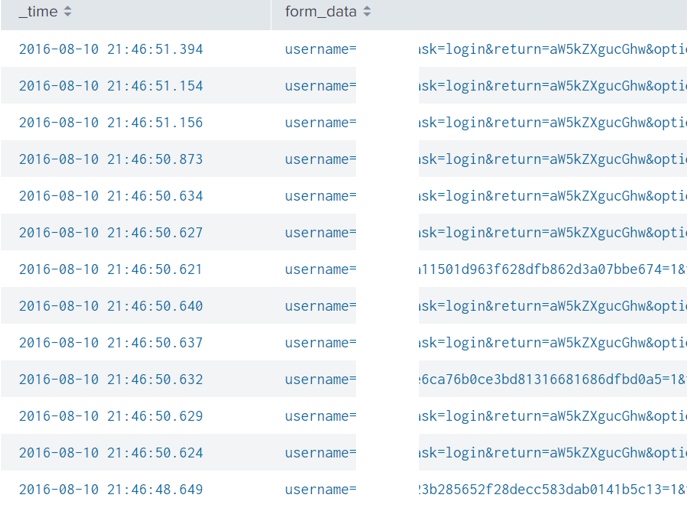
Search Query: index=botsv1 sourcetype=stream:http dest_ip=”192.168.250.70″ http_method=POST uri=”/joomla/administrator/index.php” | table _time uri src_ip dest_ip form_data. This creates a table containing important fields.
To dig deeper, we extract the fields containing the username (admin) and the passwords attempted. Using regular expressions (regex), we filter out the login attempts with these credentials and display them in a clean format. We see all the passwords the attacker tried.
Search Query: index=botsv1 sourcetype=stream:http dest_ip=”192.168.250.70″ http_method=POST form_data=*username*passwd* | rex field=form_data “passwd=(?<creds>\w+)” | table src_ip creds
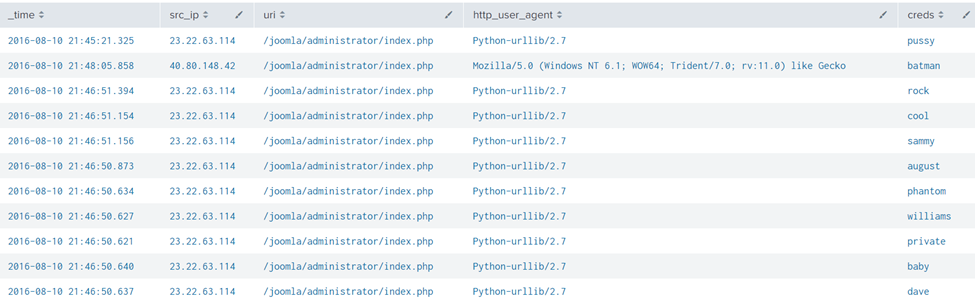
This result clearly shows a continuous brute-force attack attempt from an IP 23.22.63.114 and 1 password attempt batman from IP 40.80.148.42 using the Mozilla browser.
Question 1: What was the URI that got multiple brute force attempts?
From the above figure, under the URI column, the URI that appears many times is the:
Answer: /joomla/administrator/index.php
Question 2: Against which username was the brute force attempt made?
Search Query: index=botsv1 sourcetype=stream:http form_data=*username*passwd* | table _time form_data.
Answer: Admin
Question 3: What was the correct password for admin access to the content management system running imreallynotbatman.com?
Answer: batman
Question 4: How many unique passwords were attempted in the brute force attempt?

Answer: 412
Question 5: What IP address is likely attempting a brute-force password attack against imreallynotbatman.com?
Answer: 23.22.63.114
We just answered this question. Let’s move to the next question.
Question 6: After finding the correct password, which IP did the attacker use to log in to the admin panel?
If you have been following along, This is straightforward.
Answer: 40.80.148.42
Task 6: Installation Process
In this phase, we are trying to figure out if the attacker managed to install any harmful programs on the server after successfully getting in.
From the previous phase, we know the attacker broke into the server by guessing the admin password using an automated script. Now, we want to see if they uploaded and installed anything to take more control of the server.
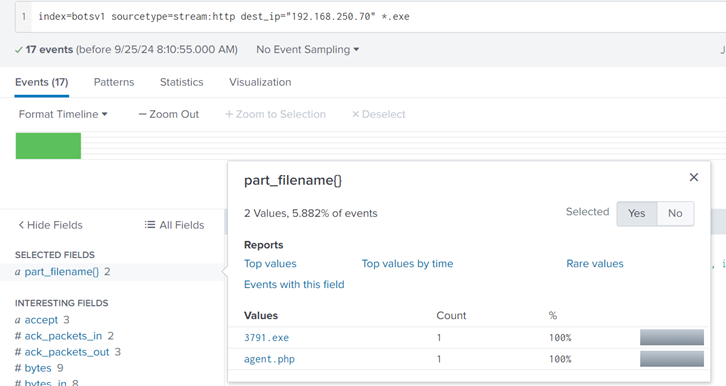
We start by searching for any files uploaded to the server, specifically looking for files with “.exe” extensions (which are executable programs). After running the search, we found two files: one is an executable file named “3791.exe,” and the other is a PHP file named “agent.php.”
Search Query: index=botsv1 sourcetype=stream:http dest_ip=”192.168.250.70″ *.exe
With the search query in place, we are looking for the fields that could have some values of interest. As we could not find the file name field, we looked at more fields and saw a field. part_filename{}.
Next, we need to check if these files came from the IP addresses we linked to the attacker earlier. We confirm that the file “3791.exe” was uploaded from one of the attacker’s IP addresses. Let’s inspect the c_ip field. Seems like client_ip. And voila, our doubts are confirmed right there. It really came from the attacker.
Search Query: index=botsv1 sourcetype=stream:http dest_ip=”192.168.250.70″ *.exe “part_filename{}”=”3791.exe”

The next question is whether this file was run on the server. To answer this, we look at logs that show if any programs were started on the server. We ran another search and found logs that confirmed “3791.exe” was executed, meaning the attacker successfully ran the program after uploading it.
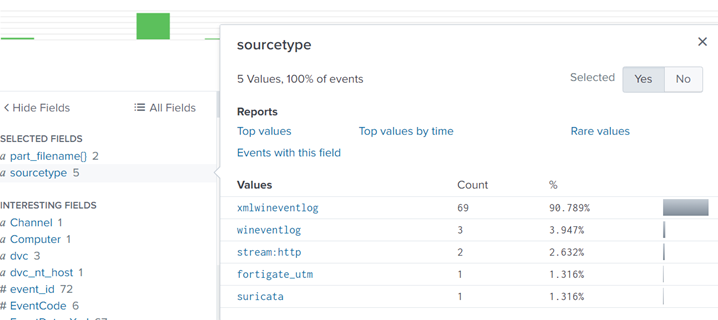
Following the Host-centric log, sources were found to have traces of the executable 3791. exe.
- Sysmon
- WinEventlog
- fortigate_utm
For the evidence of execution, we can leverage sysmon and look at the EventCode=1 for program execution.
Reference: https://docs.microsoft.com/en-us/sysinternals/downloads/sysmon
Search Query: index=botsv1 “3791.exe” sourcetype=”XmlWinEventLog” EventCode=1
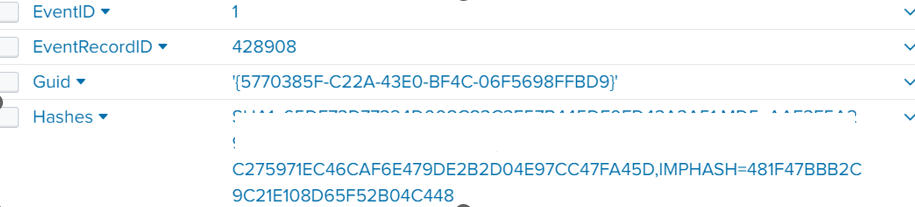
Answer: AAE3F5A29935E6ABCC2C2754D12A9AF0
Question 2: Looking at the logs, which user executed the program 3791.exe on the server?
Search Query: index=botsv1 “3791.exe” sourcetype=”XmlWinEventLog” EventCode=1. Then inspect the user_id interesting field to spot the answer
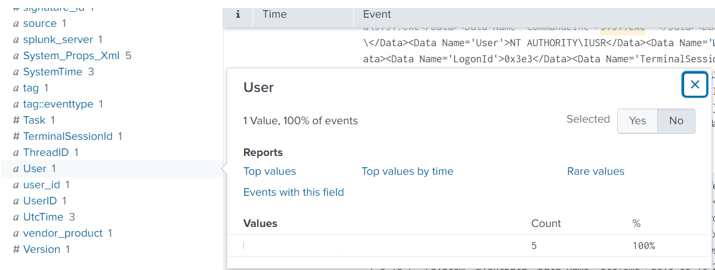
Answer: NT AUTHORITY\IUSR
The NT AUTHORITY/IUSR account is a built-in Windows account used by IIS to handle anonymous web requests. It has limited system access, but if compromised, it could allow attackers to interact with system resources. In this case, monitoring this account’s activity could help identify unauthorized attempts to exploit vulnerabilities, and ensuring it has only minimal permissions is crucial for limiting potential damage.
Question 3: Search hash on the virus total. What other name is associated with this file 3791.exe?

Answer: ab.exe
Task 7: Actions on objectives
After the attacker successfully broke into our web server, the website was defaced. Our job is to figure out what caused this defacement. Let’s start by checking the traffic logs to see if anything unusual was going on. Initially, we looked for outside IP addresses talking to our server (192.168.250.70), but didn’t find anything.
Search Query: index=botsv1 dest=192.168.250.70 sourcetype=suricata
Let’s switch it up and check if our server was sending out traffic instead.
Search Query: index=botsv1 src=192.168.250.70 sourcetype=suricata
The results are a bit strange cause normally, servers don’t send out much traffic; it’s usually the clients (like web browsers) that make requests. But here, our server was sending a lot of data to different external IPs, which is a red flag.
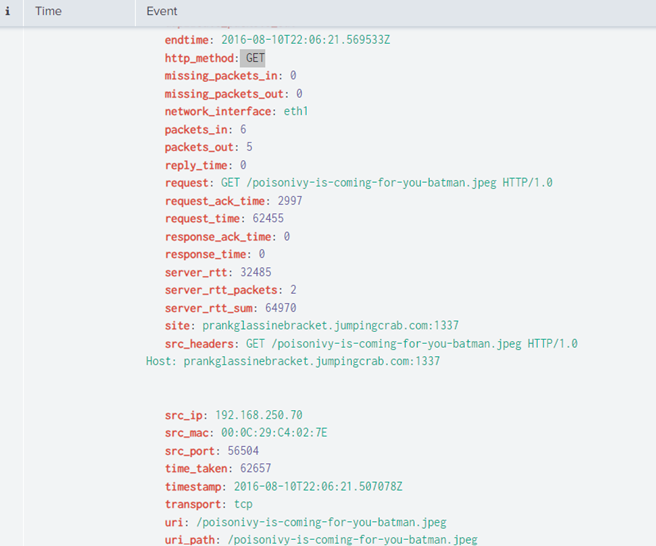
Let’s take a closer look at one of these IPs (23.22.63.114 — remember this IP?). As We inspected the URL field, we found that our server had been sending out two PHP files and a JPEG image file. One jpeg file, in particular, should have our attention, well, because it has poison in its name. Sounds malicious.
Search Query: index=botsv1 src=192.168.250.70 sourcetype=suricata dest_ip=23.22.63.114
Now, let’s trace the source of this ‘poisonous’ file.
Search Query: index=botsv1 url=”/poisonivy-is-coming-for-you-batman.jpeg dest_ip=”192.168.250.70″ | table _time src dest_ip http.hostname URL.
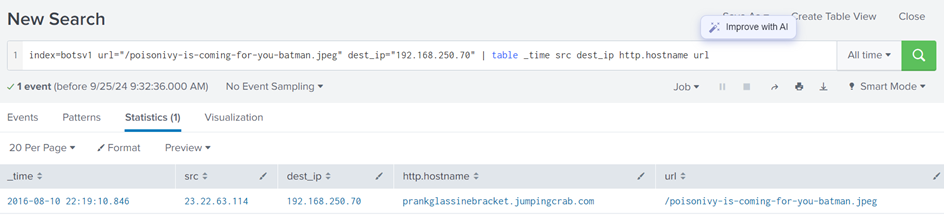
It’s now clear that the image was downloaded from an attacker’s site, prankglassinebracket.jumpingcrab.com, and this is the jpeg that defaced our website.
So, the attacker uploaded this suspicious image, and that’s how they managed to deface our website.
Question 1: What is the name of the file that defaced the imreallynotbatman.com website?
We already have this from the previous images that I have shared.
Answer: poisonivy-is-coming-for-you-batman.jpeg
Question 2: Fortigate Firewall ‘fortigate_utm’ detected SQL attempt from the attacker’s IP 40.80.148.42. What is the name of the rule that was triggered during the SQL Injection attempt?
Answer: HTTP.URI.SQL.Injection
Task 8: Command and Control
The attacker used a method to hide their IP by relying on something called Dynamic DNS, which connects their malicious IP to a domain name. Our goal here is to figure out which IP the attacker used during this process.
To do this, we will start by checking our firewall logs to see what traffic was going to or coming from the attacker’s IP. In the logs, we find the source IP, destination IP, and the URL tied to the attack. The URL shows the domain name used by the attacker.
Search Query: index=botsv1 sourcetype=fortigate_utm”poisonivy-is-coming-for-you-batman.jpeg”
Looking into the Fortinet firewall logs, we can see the src IP, destination IP, and URL.
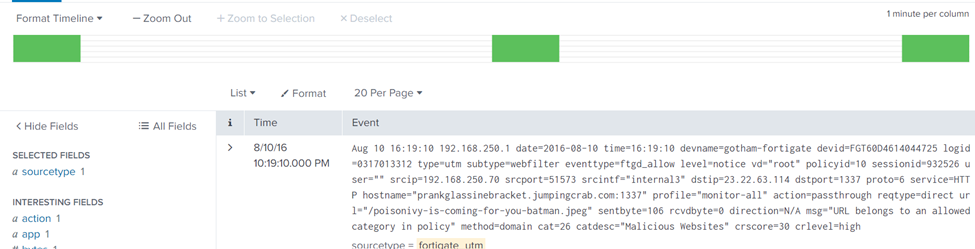
Upon inspecting the URL field, we find that it contains the FQDN (Fully Qualified Domain Name) which is prankglassinebracket.jumpingcrab.com.
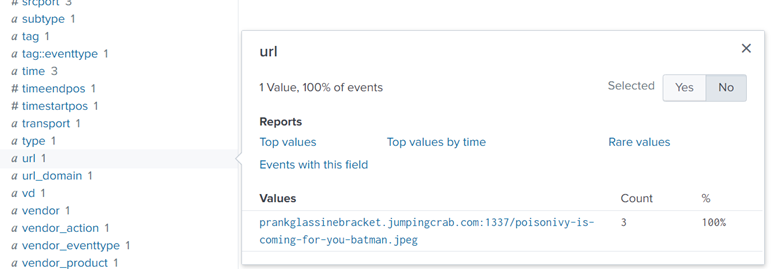
To double-check this, we can also review logs from another source, specifically HTTP traffic logs, and we will find the same domain connected to the file “poisonivy-is-coming-for-you-batman.jpeg.”
Search Query: index=botsv1 sourcetype=stream:http dest_ip=23.22.63.114 “poisonivy-is-coming-for-you-batman.jpeg” src_ip=192.168.250.70.
From this, we have confirmed that the domain was being used as a Command and Control server, meaning it was how the attacker communicated with our compromised server after they took control.
Question 1: This attack used dynamic DNS to resolve to the malicious IP. What fully qualified domain name (FQDN) is associated with this attack?
We already got this.
Answer: prankglassinebracket.jumpingcrab.com
Task 9: Weaponization Phase
In this phase attackers are preparing their tools to break into systems. Here’s what they typically do:
- Create malicious software (malware) or documents to gain access or avoid being detected.
- Set up domains that look like real ones to trick users.
- Create a Command and Control (C2) Server to control the infected system after breaking in.
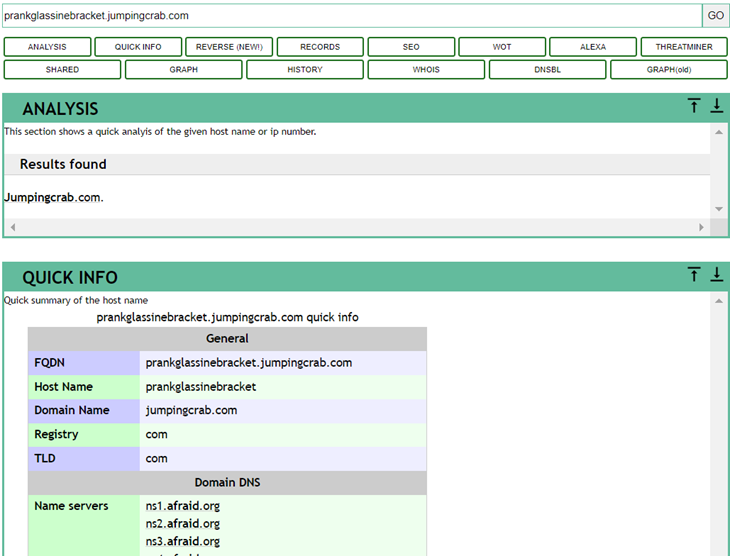
In our case, we’ve already found a domain, prankglassinebracket.jumpingcrab.com, linked to the attacker. Now, we need to dig deeper into this domain and other related info.
Step 1: Use Robtex to Investigate
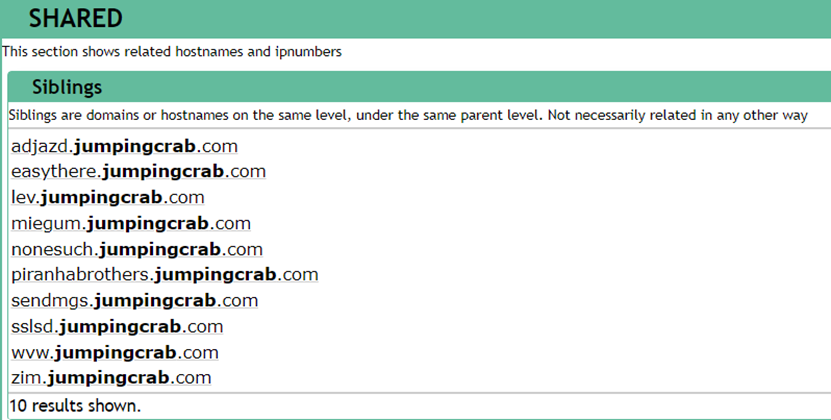
Robtex is a tool to look up domain and IP information. When we search for this domain, we will find some suspicious domains and subdomains. These might be used for similar attacks. For example, we found that IP 23.22.63.114 — I hope you can recall this address is connected to some domains that look like Wayne Enterprise’s website.
Check these links:
- Robtex Domain Lookup: prankglassinebracket.jumpingcrab.com
Some domains/subdomains associated with this domain:
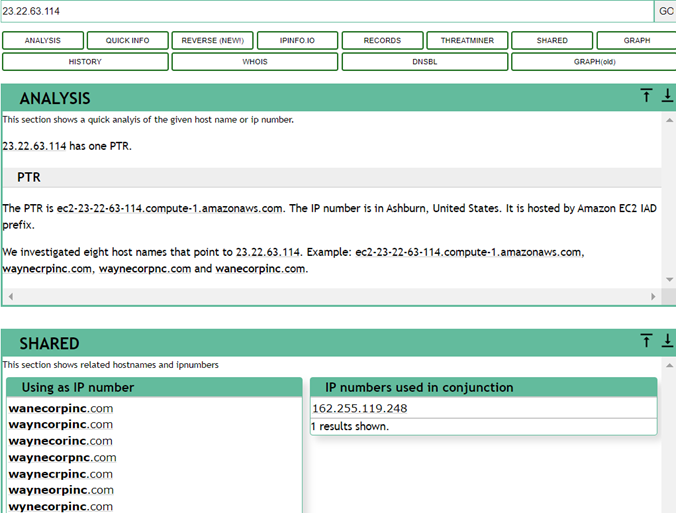
Next, we search for the IP address 23.22.63.114 on this Threat Intel site. This IP is associated with some domains that look pretty similar to the WAYNE Enterprise site.
Step 2: Use VirusTotal for More Clues
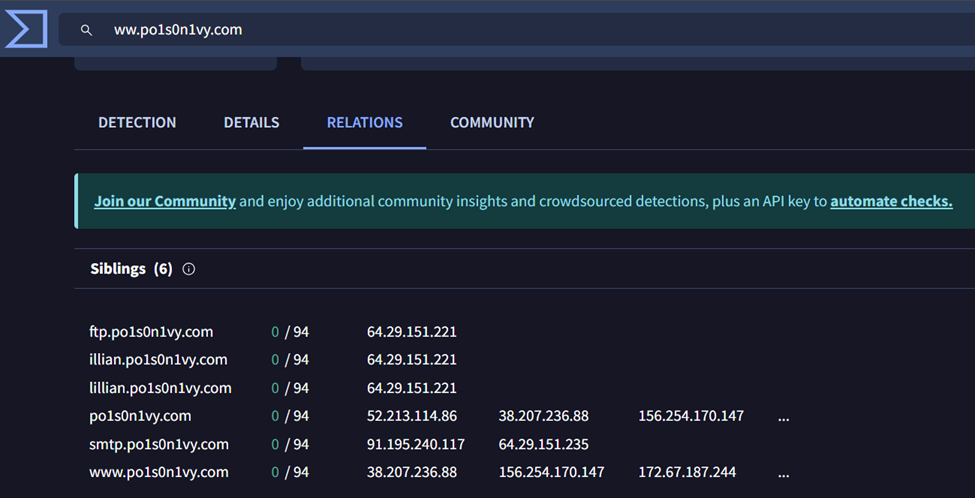
VirusTotal helps analyze suspicious files, domains, or IPs. Searching for IP 23.22.63.114 here, we find it’s connected to other domains, and some even look similar to Wayne Enterprise’s site.
One of the domains we found, www.po1s0n1vy.com, is likely connected to the attacker. Searching for it on VirusTotal gives us more info.
Step 3: Check Whois
Using whois.domaintools.com, we can get more information, like the registration details of domains, which can sometimes help track the attacker.
In short, by using these tools, we can gather more info on how the attacker set up their malicious infrastructure.
Question 1: What IP address has P01s0n1vy tied to domains that are pre-staged to attack Wayne Enterprises?
Answer: 23.22.63.114
Question 2: Based on the data gathered from this attack and common open-source intelligence sources for domain names, what is the email address that is most likely associated with the P01s0n1vy APT group?
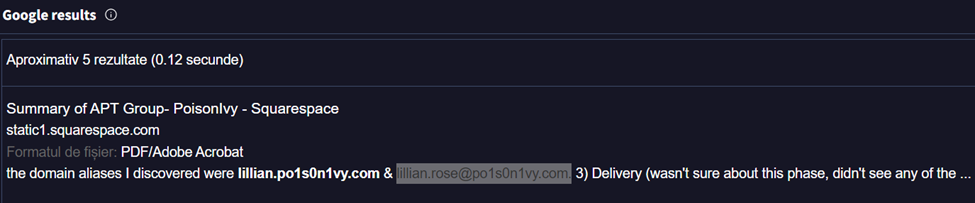
Answer: lillian.rose@po1s0n1vy.com.
Task 10: Delivery Phase
In the Delivery phase, the attacker tries to get their malware onto the target system. This can be done through email, infected websites, or other tricks. Our job here is to use the info we have (like IPs, domains, and email addresses) to hunt for any malware linked to this attacker.
For this task, we’re focusing on an adversary group called Poison Ivy, which has a backup plan if the first attack doesn’t work. Our goal is to learn more about their methods and use tools to match the data in our logs with what’s known about them.
Tools /OSINT sites we’ll Use:
- ThreatMiner: This site helps find files, malware, and other things connected to an IP.
- VirusTotal: A tool that checks files and websites for malware.
- Hybrid Analysis: A site that shows what happens when a piece of malware is run.
What We Found:
- Searching for IP 23.22.63.114 on ThreatMiner, we found three files linked to it. One file, in particular, stands out with the hash c99131e0169171935c5ac32615ed6261. This file looks suspicious and is likely malware.
- You can check this file out here: ThreatMiner Link
- Next, we looked up this file on VirusTotal. The Details tab here will give us more information about the malware, like when it was found and other insights.
- Check it here: VirusTotal Link
- Finally, we used Hybrid Analysis to see what happens when this malware runs. This tool shows us details like:
- Who the malware talks to on the network.
- Any strange actions it performs, like opening files or making changes to the system.
- Mapping to known attack methods (MITRE ATT&CK).
- Screenshots of what the malware does.
You can explore the malware behavior here: Hybrid Analysis Link
With these tools, we can see how the attacker delivers malware and how it behaves once it infects a system.
Question 1: What is the HASH of the Malware associated with the APT group?
Answer: c99131e0169171935c5ac32615ed6261
Question 2: What is the name of the Malware associated with the Poison Ivy Infrastructure?
Answer: MirandaTateScreensaver.scr.exe
Task 11: Conclusion.
Here is a quick summary of what we did:
In this fun exercise, as a SOC Analyst, we have investigated a cyber-attack, where a website, “imreallynotbatman.com,” was defaced. We broke down the attack into 7 phases of the Cyber Kill Chain:
- Reconnaissance: The attacker scanned our web server from IP 40.80.148.42 using Acunetix.
- Exploitation: A brute-force attack from IP 23.22.63.114 was successful, giving access.
- Installation: A malicious file, 3791.exe, was uploaded to our server.
- Action on Objective: The attacker defaced the website.
- Weaponization: Domains and an email linked to the attacker were found (prankglassinebracket.jumpingcrab.com, IP 23.22.63.114, and email Lillian.rose@po1s0n1vy.com).
- Delivery: Malware (MirandaTateScreensaver.scr.exe) was discovered, and linked to the attacker.